Monday, August 22, 2011

Button down shirt dress tutorial


My brother Joe came out to visit for Christmas last year. He has always lived a lot farther away then the rest of the family and we love it when he can make it out for a visit! This time when he cam he left a blue button up shirt. The shirt has been hanging around my apartment for a long time. I figured if he hasn't asked back for it yet he isn't planning on it.  So I finally decided to do something with it. So I have come up with this simple and cute tutorial for a little girl dress! 


First thing i did was measure around my daughters chest. Take that number add 2 inches then divide it in half. That will be the width of your chest piece. Then add four inches. That will be the width of your bodice piece. So say your daughters chest was 20inches around. Add 2, that makes it 22 then divide in half. That makes it 11 then add four so 11; chest, and 15; bodice. (These numbers are made up don't really use them, make sure you measure whoever you are making the dress for! ) Remember these numbers. Lay your shirt out flat and buttoned up. You are going to draw three boxes on the front of the shirt. 


The width of your first box will be the smallest number you just measured(11). This is for your chest piece. I guessed how long I wanted it to be I did like four inches I think, three inches for the actual length then one inch for seam allowance.  Make sure you center all your boxes over the buttons! This is very important so all the buttons align in your dress at the end. Then draw the second box under it (15). This is for your bodice piece. For the length of this one I measured one of my daughters other dresses to get an idea of how long I wanted it to be. Then i subtracted the three inches from the chest piece. So say the dress I measured was 24 inches long, take that number minus three. So the length of your bodice piece will be 21 inches. Your third box will be the width of the entire shirt. This is the ruffle at the bottom. The length will be how ever much room you have left on your shirt. I think I got like three inches squeezed in there. 


Cut out all you pieces. You should have a front piece and a back piece to each box. Keep the front pieces buttoned. Put the front and the back pieces right side together and sew 1/4th inch seam on each side of all three boxes. It will look something like this when it is done. 


Sorry there isn't the ruffle piece in this pic I don't know why it's not in here! So now take your bodice piece and unbutton it. Set your sewing machine to the highest tension and to the longest stitch. Sew around the top of the bodice piece so it gathers together. Do the same with the ruffle piece. 


Then take your chest piece unbutton it lay it out. Take the bodice piece you just gathered and lay it on top of the chest piece pin them right sides together. You might have to pull your gathering out a little. Just make sure you have the buttons on the same side so the dress will button up right! It should look something like this. Then sew 1/4th in seam. Then iron it down really well. 


Then take your ruffle piece and align it to the bodice piece. Right sides together and sew 1/4th inch in and iron  it really well.  Pretty much the same thing you just did. Again make sure to align the buttons on the right side! Just like this. 


Now you are going to hem the top and the bottom of the dress. Iron and double roll the top and bottom about 1/4th inch and pin. Then sew around the top and the bottom. 


Next you need to make the ties for the straps. I used the sleeves of the shirt and cut out 4; 1 inch wide and and 6 inch long pieces. Then I ironed both edges in to the center then folded it in half and ironed it down again. Then I sewed across it. It is essentially like hemming. 


Then I measured the outside of Sophia's arm to the armpit. I buttoned up the dress and took the length of her arm to armpit and measured from the edge off the dress in and that's where I added the straps. Like this. 


I just sewed across them. Try to line it up to your existing hem line so you don't have a random extra line across the top. That's it! Your dress is done! It should look something like this on your little girl! 


As always you can add all kinds of different options to make it unique. You could add pockets or thick straps that don't tie or fun shoes like Sophia's! Try it out and send us pics!! 


~A


Linked up to:

Todays Creative BlogTip Junkie handmade projects

I'm topsy turvy tuesdays


Friday, August 19, 2011

REFASHION: You Design

I'd like to first start out by saying how truly amazing and creative my fellow business-women are. They are wonderful mothers and definitely know how to make a beautiful home on a cheap budget. As for me, it is just me and my husband in our small apartment at the moment and one thing is for sure, I LOVE clothes! I'm big on fashion but not big on the expensive prices. For all of you who are like me and love many of the newest fashions but don't want to have to pay an arm and a leg to get it, I've found a solution!

I've recently been introduced to the world of REFASHION. Now I can have the styles I want for virtual nothing in cost. All it takes is knowing what you like and having the guts to give it a try. The great thing about recycled and refashioned clothing is the way that old clothes, styles, and fabrics inspire you to create something gorgeous and new.

Below is a dress that my sister handed down to me. I never really liked how this dress fit my body so it sat in my closet for several years. A couple months ago when I was walking through a store I found this gorgeous ruffle skirt which made me think back to the abandoned dress. It gave me the idea to turn something I never wear into (hopefully) something I would enjoy much more. It was one of my first refashions so I definitely had my struggles with this project, but the result turned out great and it is now one of my favorite skirts!


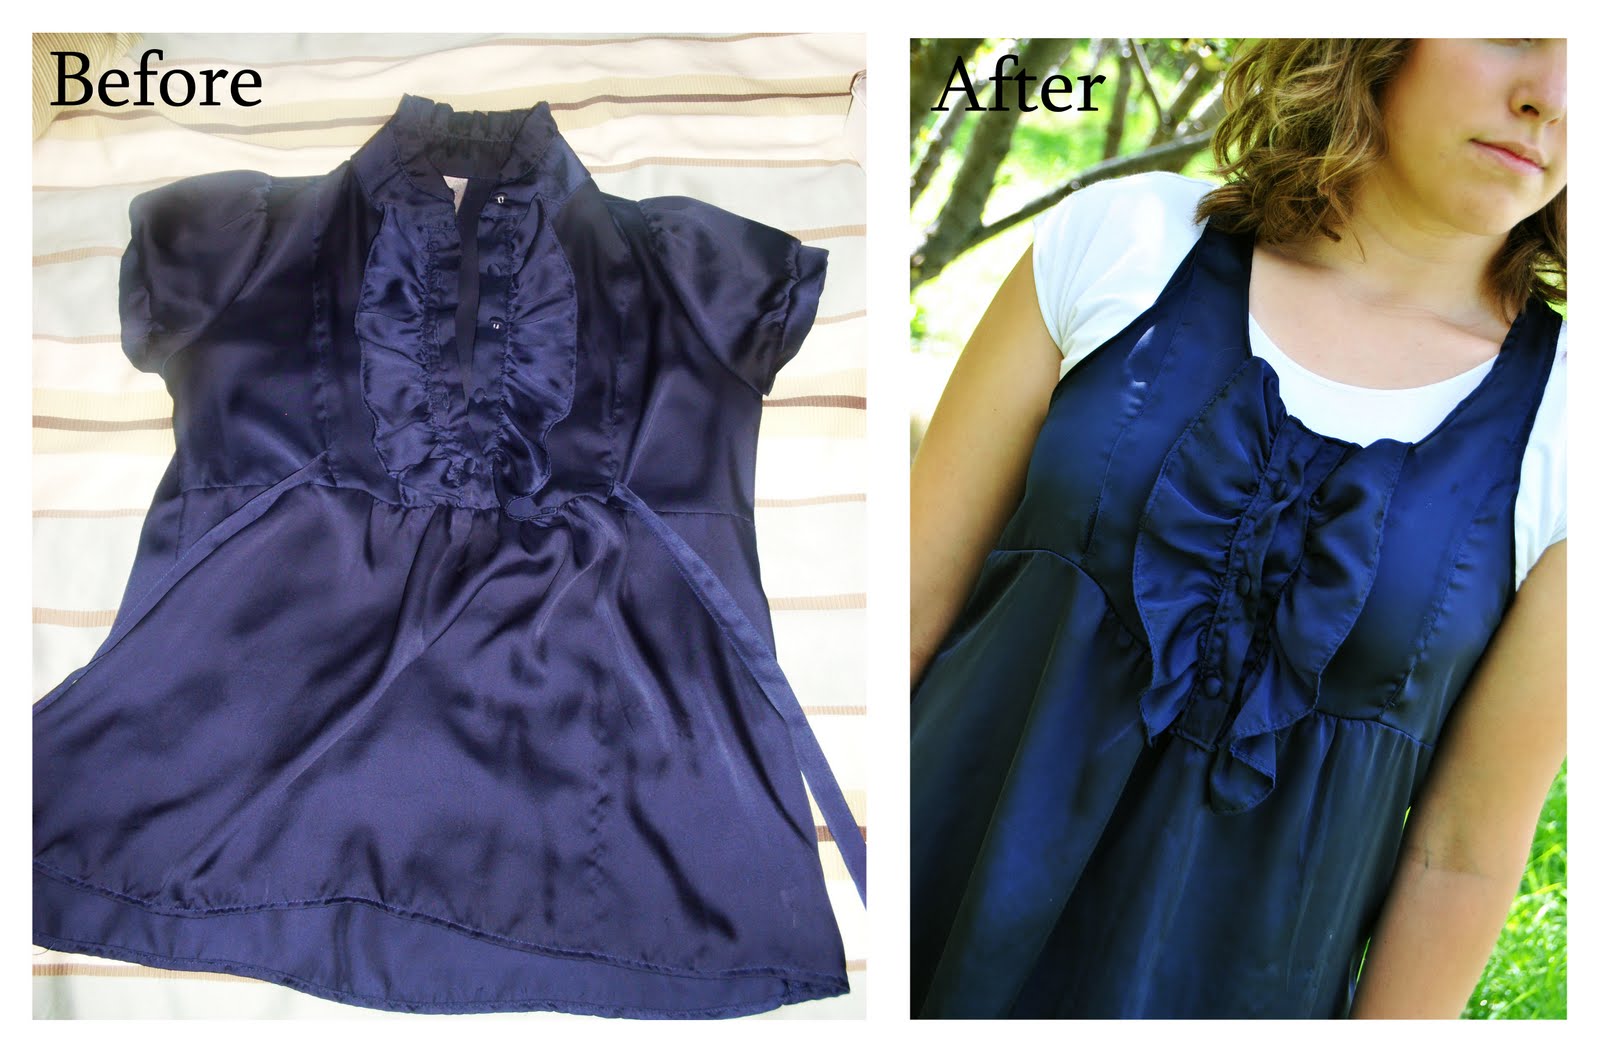
Another daring refashion I tried my hand at was this old shirt from Forever 21. I had seen many loose fitting silk tank tops all over the place and knew I had to have one, especially during this hot summer. Silk is definitely not the easiest of fabrics to sew on, but in the end this shirt became honestly one the most comfortable shirts I own!


Lastly, the most favorite of all my refashions and the easiest is my refashioned Bermuda denim shorts. I had been wanting to buy a pair all summer but never had the money, so I went down to the thrift store and found a pair for jeans. I found the perfect pair and for $6.00 I now have a cute pair of shorts!

J Crew $59
DI $6

So how hard is it to refashion clothing? I will admit that I was very intimidated and even scared at first. I had no idea where to start and was unsure of my capabilities to refashion clothes. It wasn't until I dove in and began changing clothing to my likings that I started to gain confidence. It is not uncommon to hear people say they wish they could sew, or that they had the creativity of others. I honestly do believe though that anyone can do it. Refashioning does not need to be as advanced as creating a new dress from an existing garment, it can be as simple as cutting off a pair of jeans into shorts, and sewing on a few motifs or buttons, or perhaps repainting a pair of shoes. I challenge all of you to give it a try and to be sure to send us a picture of your creations! Good Luck!

Wednesday, August 17, 2011

Bachelorette Party

This summer is wedding season for me! I have two cousins, a sister, and a best friend getting married. My really great friend Alli is getting married tomorrow! I am so happy for her. Jared is a lucky man! Last night we through her a bachelorette party. We decided to do a girly pink and black theme with a wine glasses. It turned out so cute.


We had this cute back drop with a paper banner that we used to take pics in front of and do a little video diary for Alli.


The place settings turned out so cute! They were a hit. I found the giant engagement rings at Walmart. We wore them all night. Even grownups love fake jewelry!


All the wine glasses were different styles it gave the table so much character and everyone got to take there glass home as a little momento. Inside were little strawberry garnishes with the bride and grooms initials on them for a little personal touch. 


Of course what kind of party would it be without a bunch of yummy food! Which we aren't ashamed to say we ate a lot of. 


We went with an camp out food theme but that you could bake in a pan. We made s'mores bars and cherry cobbler bars. SO so good! Here are the links to the recipes! S'mores barsCherry cobbler bars


Not only good food but delicious drinks are a must! We had yummy strawberry daiquiris and pina coladas! A great time was had by all (notice all the rings!). The best part of throwing a party is the great company that comes. We had a blast, and congratulations to miss Alli who will soon be Mrs. Taylor.  

~A


Monday, August 15, 2011

Simple Jumper for Baby


When I was getting ready to have Mia, everyone told me that babies grow so fast so not to get very many newborn or 0-3 month clothes so I tried not to get very many. Either Mia is growing slowly (which isn't indicated in her weight gain) or I get bored with just the few outfits she has to wear that fit her after a couple of times wearing them, so I wanted to get some more clothes for her. After going to a couple of stores and realizing that they don't make a whole lot of clothes for babies under 6 months and clothes that are cute, I decided to take matters into my own hands and make some for her.


I started with this basic jumper. The great thing about this jumper is you can add different embellishments or leave it simple and no matter what, it will be a cute and easy addition to your child's wardrobe. I made this jumper for my 3 month old, but this sizes can easily be adjusted to fit your child by just using their measurements. 


What you'll need:
Scissors
1/3 yd of fabric (I used corduroy)
thread that matches your fabric
2 buttons
Some paper to draw pattern


Ok, now that you have everything gathered we're ready to start making our pattern with the paper. These are the measurements that I got when making the dress to fit my 3 month old. If you want to make a different size use a shirt or dress of you child's to help with the measurements, then roughly draw your front and back pieces. Keep in mind a 1/4 seam for sewing pieces together.


Once you've cut out your pattern, cut out two of each of the front and back pieces. For the bottom piece of the jumper you are going to cut a rectangle from your fabric. Mine measured about 13 inches wide and 12 inches long. *For bigger sizes you just want to at least double the length of your measurement from your front piece and make it as long as you want for your child. Also keep in mind a 1/4 to 1/2 inch seams while making your measurements. When you are finished you should have all of the pieces seen below. (The two half circles are for the pocket)


 Now take your two main pieces of the jumper and put rights sides together and then fold the whole thing in half to cut  your armholes. Draw an arch from the top to the side, creating the armholes. It should look something like the picture below.


Once you have done that, still with right sides together, pin from the bottom of the armhole to the bottom of the main piece and sew. Repeat on the other side. To finish off the seams and to prevent fraying I like to zig-zag the edges. Now we are going to finish the armholes. Fold the unfinished edge of the armhole in a little less then a 1/4 of an inch, iron, and then fold over again; iron and pin. Sew as close to the edge of the fold as possible.


Below is what your finished side seams and armholes should look like with the top of the main piece still  unfinished so you can gather it.


Now, we're ready to gather the tops of the main piece. To gather fabric, set your sewing machine on your highest tension and longest stitch. Sew each top piece separately with a 1/2 seam and don't back stitch! As you sew the gathering will already start to happen. To gather more once you are finished pull the bottom thread of the seam. (Gathering fabric is easy once you have done it once or twice, but the first time can seem a little tricky. Just go slow and don't pull too hard while gathering your fabric or you will break the thread.)


This is where I got a little lazy with taking pictures. Sorry! Now that we have finished the main piece of the jumper we are going to sew the front and back pieces. You should have 2 front pieces and 2 back pieces. Pin the two front pieces together with right sides together. Sew together with a 1/4 seam, leaving the bottom open to flip your front piece to the right side. I started from the bottom corner and sewed up the shoulder piece, down the collar and up and down the other shoulder piece to the other bottom corner.  Repeat these steps with the two back pieces. Flip the front and back piece to the right side and iron flat.

This is what you should have so far.


Next, we are going to sew the front and back pieces to the main piece. First, take your back piece and fold and iron the unfinished bottom edges in about 1/4 inch. Then pin one of the gathered sides of the main piece to the inside of the back piece. You might have to gather the main piece a little more or less to make it fit into the back piece. Starting at the bottom corner of the bottom piece, top-stitch across the length of the bottom piece and then continue to top-stitch the rest of the bottom piece. Make sure to top-stitch as close as you can to the edge. Repeat these steps to sew on the front piece to the other side of the main piece.
(Sorry for the misspelling in the text on the picture!)


You're almost finished! Now all you have to do is hem the bottom of the jumper by folding the unfinished edge up 1/4 inch, iron, and then fold up another 1/2 inch and sew. Lastly, sew button holes to   each shoulder strap on the back piece of the jumper (I did this using my sewing machine, which did it all for me. I love it!) and then sew your two buttons onto the two front shoulder straps of the jumper. 

You now have a cute jumper for your baby! (Mia was getting a little impatient that it was taking me so long to get a picture of her after all the smiling she had done earlier.)


Like I mentioned earlier, you can add different embellishments to your jumper. I added a pleated pocket to mine. You could also add ruffles to the bottom of the jumper or to the top of the pocket. Another thing that you could do with this jumper is use two different fabrics for the top and bottom pieces and the main piece. The possibilities are endless!


Enjoy! ~H


Linking here: 

monogramTodays Creative BlogI'm topsy turvy tuesdays


Monday, August 8, 2011

Giveaway Winner!

 Thanks to everyone who came out to Arts in the Park, visited our booth, and made it a huge success! We met some really great people and enjoyed sharing our love for crafting with those in Ely.

For those of you who couldn't make it to our booth, check out our shop and ordering pages. We specialize in custom orders to meet your needs, so shoot us an email! 


Now for the part that everyone has been waiting for! We are going to announce the winner of the $10 gift certificate, giveaway to our shop! The winner has been randomly selected. Thanks again for everyone who entered the giveaway and supported the opening of your shop!

The winner is #5 Kimberly Perez

We'll be contacting the winner with more information! CONGRATS!

Starting next week, we will be kicking off the week with a new tutorial and continue posting weekly with more tutorials, crafting tips and future giveways!

Tuesday, August 2, 2011


We are excited to announce that we will be kicking off the opening of our business with a booth at this years Arts in the Park in Ely, Nevada on August 6th and 7th! Arts in the Park is annual  fair that features over 100 booths of arts, crafts, ethnic and fun foods. Vendors display handmade goods as well as photography and other artist activities. Hours are 10 am-6 pm on Saturday and 10 am-4 pm on Sunday. 


We will also be having a GIVEAWAY that we will announce at the end of the fair! Each item you purchase is an entry into the drawing for the giveaway. For another entry, like our page on facebook! The winner will be announced Monday, August 8th!


So please come enjoy the festivities and visit us at our booth to find affordable handcrafted items for your home or for that cute baby in your life and enter a chance to win!